Thursday, June 28, 2012

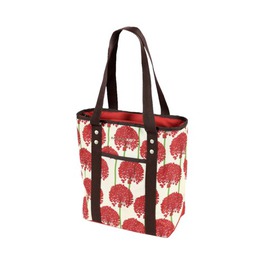
Basil's Elements Fashion Bicycle Bag

Basil's new Elements Fashion Line of Shoulder / Bicycle Bags work on & off your bike.
Summer is the perfect time to get out and explore.  The warmer weather and slower pace of things can turn your vacation time into a great opportunity to enjoy outdoor living and travel.  If you haven't been on a bicycle in a while, how about getting reacquainted with bicycling?  You don't have to let the rising cost of gas turn your vacation into a stay-cation!  Get out there and pedal.  You can discover your local parks and recreation areas or take a leisurely shopping trip to the Farmer's Market.


The Elements Shoulder Bicycle Bag by Basil NL
I like to ride my bicycle and I enjoy shopping.  With the Elements Shoulder Bicycle Bag, I'm free to do both!  This fashionable shoulder bag has long straps for easy carrying and is appointed just like my designer handbags.  It has two snap pouches on either end for my water bottle and umbrella. The fabric itself is water resistant and very durable with a vinyl bottom and feet. The hanging clips shown below are genius.  The bag stays securely on but all you need do is pull up on the straps and away you go.  The clips then hide away under a secret zipper pouch.  Neat huh?


To Market To Market, Jiggity Jig
The bag interior itself is very roomy.  If you wanted to use it as a market bag, I would suggest getting a RuMe Bag.  They come in several sizes and roll up to about the size of a mini umbrella.  They are reusable and you can separate your market items from your shoulder bag contents by placing them in the RuMe Bag.

Basil Elements clipped on the rear rack of a classic Schwinn Admiral
There are a few things I make sure to take along on all my bicycle trips because you're really on your own out there.  I always carry an Ultralight Watertight Adventure Medical Kit extra aspirin, feminine supplies and in the summertime, Mission Athletecare Sun Defeated Sunblock, Fresh Bath Wipes and serious deodorant, (notice the "clinical strength")!

The Elements Bag has lots of room, a beautiful lining and a zippered inner pouch for your cell
Double Duty-Bike or Walk
The comfortable long straps are rounded and soft so they don't dig into your shoulders.  This makes this bag the perfect walking companion once you get off your bicycle.  On the bike, it quickly snaps onto most any size rear rack.  I've seen women in New York City with huge wire front baskets.  They put their handbags in them but I'm always leery about having that much weight up front.  This carrying system is so much more efficient and elegant. Better still, no one will ever know this is a bicycle bag until they see you ride away with it clipped on.  Even then, they may not be so sure!  Stop by the Basil of the Netherlands website to see more of their cycle chic yet innovative bicycle bags and baskets.


Definitely showing some bike love here!

Tuesday, June 19, 2012

Back Country Cooking

This summer try a back country hike & foraging excursion
There are so many good things to eat if you know where to look.  Maybe in your own backyard?  Back Country Cooking uses organic, wild foraged edibles and can really add interest to your next hike or camping trip.

KNOW YOUR PLANTS

Some plants are pretty obvious as weeds tend to be the most prolific and recognizable.  Weeds are a great place to start!  Did you know that young Dandelion, Clover and Lambsquarters greens make a delicious salad?  Also wild Mulberries are scrumptious eaten raw or added to a salad.  In my book, Nature's Weeds, Native Medicine - Lotus Press I explain that many such plants not only taste good but have great medicinal value as well.  Dandelion root tea for example, is rich in iron and acts as a liver detox.

To familiarize yourself with other more important plants I recommend the Edible & Poisonous Plant Cards from Camping Survival  You can take them for a little hike in your backyard to begin identifying and harvesting greens and edibles from clean, un-sprayed areas.  When you do this enough, you can take the card with you on your hiking or camping trip to find the same plants in the wild.  The card deck has full color photos on one side and detailed descriptions of the plants on the reverse.


CAMP COOKING


Update: This summer, we rented a small cabin again in one of our state parks for a week.  I prepared nearly all of our meals on a simple Trangia Camp Stove.  Everything from eggs and bacon in the morning to more elaborate meals at night.  The Backcountry Cooking Deck gave me ideas on how to organize and carry in our meal ingredients.  We also had the addition of piping hot soups from Augie Foods!  These were easy to prepare and utterly delicious.  The Backcountry Cooking Deck by Dorcas S. Miller (Mountaineers Books) is a set of 50 large recipe cards for camp and trail.  Covering all sorts of easy meals for breakfast, lunch, dinner as well as snacks and dessert, these cards offer delicious variety and much needed nutrition for your campers.  

What I like about these cards is that they all include "At Home" pre-prep instructions to help make the meals easier to put together once you're out there.  One of the most versatile recipes from the deck is the Biscuit Mix.  It is very simple to throw together at home but transforms into pancakes, biscuits, pie dough, coffee cake or dumplings on the trail.
Backcountry Cooking Deck of 50 Recipes for Camp and Trail
The deck recipes include wholesome ingredients like wheat germ, whole wheat flour, quinoa, bulgar, nuts, vegetables and berries.  I can't say that I'm too sure about some of the tuna, salmon and mussels based recipes as fishy smells tend to attract all sorts of critters but the wide array of various ingredients will appeal to nearly everyone's palate.  The Hobo Dinner recipe uses Jerusalem Artichokes which are native to North American and relatively easy to find and harvest in the wild.

Light My Fire Outdoor Meal Kit
 
Augie Foods Cheddar Broccoli Soup in the Light My Fire Meal Kit


I like to bring along my SOL Origin Survival Kit  plus an Aurora Magnesium Fire Starter.  The survival kit has fire starting and survival tools all in one and the Aurora Magnesium Fire Starter can even ignite your camp stove's gas burner.  It is always good to have a back up cooking / heating method when you take to the outback. 

TecX Inceptra with blue anodized aluminum handle makes quick work of kindling.

The same thing can be said for a camp knife.  The SOL Origin comes equipped with an AUS-8 blade folding knife with a light in the handle. This is good backup and you will need to sharpen it first but I would reserve it for emergencies. My primary knife for cleaning fish, preparing kindling, cutting rope, etc would be this TecX Inceptra folding knife from W.R.Case. It is much easier to open and use than the traditional Swiss Army knives. The 440 stainless steel blade and blue anodized aluminum handle equals a nearly indestructible knife you don't have to worry about. The stainless steel blade locks in place and the knife comes with a belt and key ring clip. The TecX Inceptra comes pre-sharpened and ready to go as you can see it made kindling very quickly in the photo above.  A definite must for all your camp cooking & fire starting needs.


Camp cooking eggs and sausage.  Trangia Camp Mess Kit & Stove

Tuesday, June 12, 2012

Taking a Bicycle on Vacation

Citizen's Barcelona Folding Bike at the Beach

Summer is here and perhaps you've already made your vacation plans: Trips to the beach, a cruise or my favorite, a woodland cabin retreat.  Any of these destinations and more can be made all the better by taking along a bicycle.  Cycling is the best way to intimately enjoy the local atmosphere.  It also takes care of the problem of getting in your exercise while vacationing.

Some people use car mounted bicycle racks to take their bikes along. I've done that too but if you're staying at a hotel you might want to bring your bike with you into your room. Traveling by plane or train? Well, that car rack isn't going to be much help so why not consider taking a folding bike?

Folding Bikes like this one by Green Zone are ideal for vacation and travel.


Green Zone Alloy Folding Bicycle
We've taken this folding bicycle on the train to New York City last summer.  We took a trip downtown to the Marina at Chelsea Piers via the New York City Bike Path / Greenway. This Green Zone folding bicycle packs easily into a canvas bag which comes with it. However it is a folding bike with a LOT of features:  Rear spring rack, fenders, 7 Speed Shimano shifters and a sweet bell are ALL included.

The Train Trip
The folding bike itself was very quick and easy to pack into my car trunk, carry on the train and then set up at our destination. It took about 30 seconds (seriously) to unfold on the street outside the train station - ready to ride.  We clipped on our Trek Trunk and effortlessly zipped down the Bike Path!
Our Green Zone in its bag for the train ride!

I've seen full sized bicycles rolled onto trains but ours was very compact and secure in its own neat tote bag.  The picture above shows our folding bike in the bag sitting on the train seat.

Weighing in at only 25 lbs, this folding bicycle was very easy to transport while the 20 inch wheels gave us a safe and comfortable ride downtown.

While New York City is relatively flat, it's good to have 7 speeds at your disposal for hilly terrains. I've ridden the Green Zone through rural towns with rolling hills and it does just great.  The fact that it has fenders means you'll stay cleaner and dryer during a rainfall or if you hit a puddle or two.

The Green Zone at our destination - Chelsea Piers, New York City
A folding bicycle like this can go where YOU go.  Take it with you when you check into your hotel room. Ride it instead of renting a car, especially if your destination is a resort or other attraction. Need a bicycle built for two?  Yes, Green Zone makes FOLDING TANDEMS as well.  Visit their website and get some wheels to go for your BEST summer vacation ever! GREEN ZONE FOLDING BIKES


Tuesday, May 29, 2012

Keep Your "Brown Bag" Lunch Cool!

Keep your "Brown Bag" lunch COOL with these chillers!


Summer is all but here and many people are choosing to bike commute and "brown bag" their lunch.  The only problem is that either way, by bike or by car, your delicious lunch may end up spoiling in the heat.  Also, not everyone has access to refrigeration at the office, school or workplace. Then what do you do?  Well since we're expecting record high temps this summer, I say enlist help from some NEW high - tech coolers to go:

Keeping Cold Drinks Cold - Klean Kanteen

Cold drinks not only taste better but studies have shown that drinking ice cold water helps to burn more calories.  Cold drinks actually lower your core body temperature which is one of the steps in combating heat stress.

Insulated Klean Kanteens come in 12, 16 and 20 oz sizes with a choice of tops: Cafe Cap for sipping along the way or the leak-proof Stainless Loop Cap.  No matter which you choose, you'll be able to keep your iced drinks nice and chilly for up to 24 hours. Better still you can avoid artificial colors, flavors and added sugar by making your own iced tea, coffee or fruit smoothies at home. Take them with you...they will be refreshingly cold when you stop for lunch.


Keeping Lunch Fresh - Cool Gear Lunch 2 Go

Cool Gear Inc. Lunch 2 Go
You have so much more freedom of choice by bringing your lunch along.  Cool Gear makes it easy with their Lunch Series chillers.  Place the lid in the freezer the night before and the gel insert will freeze solid.  Fill the sectioned container with your favorite goodies, (don't forget a snack!), lock the lid down and go. There is even a compartment in the top of the lid to stow a spork and knife which are included.

I really like the Lunch 2 Go as it will keep your food chilled for hours.  The lettuce was STILL crispy on my sandwich after 3 hours of sitting in my hot car. No need for a fridge so you can keep your food with you where ever you go.  No more having to deal with pilfering, food stealing co-workers!  Since everything is self contained and reusable, there is no need for plastic wrap or aluminum foil.  These things have to be disposed of adding to the waste stream and ending up in a landfill somewhere. Definitely a must for those wishing to go green AND eat healthy.


Rachel Ray for Target - Insulated Lunch Tote

Super insulated lunch tote available at Target stores!
This Lunch Tote has become my all time favorite.  Just the right size, I can fit my Klean Kanteen and Lunch 2 Go inside with a little room to spare.  This will hold more than enough food for one person and has a little outer pocket to store napkins or wet wipes. Small enough to fit in my bike panniers but big enough to bring along a full lunch meal and 12 oz drink.


The Sixer Travel Cooler by Mountainsmith

The Sixer Travel Cooler by Mountainsmith Co
I'm really sold on Mountainsmith for their rugged, well thought out backpacking equipment.  So it was no surprise to see a lot of their backpacking details added to The Sixer Travel Cooler.  It comes with a detachable shoulder strap, dual easy pull zippers and even a bottle opener!  Built for traveling it has a clear sleeve on top for a map and a tie down cord on front to hold a towel, jacket or whatever.
Somewhat bigger than the Lunch Tote, it will hold a six pack of bottled beverages PLUS your Lunch 2 Go.  Great for picnics and outings when you don't want to bring along a heavy cooler.

The Wrap:

Using an insulated cooler will obviously increase the performance of your Klean Kanteen and Lunch 2 Go so for maximum chilling on hot days, use them together.  It is very important to keep food properly chilled in the summer months.  Bacteria and mold growth are not only unpleasant but can make you very sick.  Don't take chances with food poisoning and spoilage!  Keep it chilly with these cool, reusable solutions.

Wednesday, May 16, 2012

Shore Delights

Delicious fresh clams and oysters from H. M. Terry & Co. are shore to please!
One of the best things about summer at the Jersey Shore are the delicious seafood delights.  Oysters, clams, muscles plus all types of fresh fish.  When I plan an outdoor picnic, I always like to include shellfish on the menu.  Oysters and clams are easy to prepare either slightly steamed just until they open or served raw on a half shell with a little hot sauce.  It really doesn't get any better than this!
Opening a raw oyster with an oyster knife

If you would like to add shellfish to your next outdoor party, top them with wet paper towel under ice in a bucket with a strainer underneath until you're ready prepare them.  We also store them loose in the vegetable bin of our fridge with the humidity set on high.  The eastern variety shown here are Sewansecotts harvested from Hogg Island, VA.  They are very meaty with a clean seawater flavor. They are live creatures and will not survive immersed in fresh water.  I like to give both clams and oysters a good scrub and rinse before preparing.  You don't want a lot of sand and mud in the presentation. Once they are clean, start at the back hinge of the shell and pry until the raw oyster pops open.  If you are opening raw clams, slide the knife around the front to cut the muscle then twist to open.  You can then use the knife to separate the meat from the shell and serve it on a half shell over ice.

Oysters Rockefeller is easy to make with a spinach topping.
Oysters Rockefeller uses lightly steamed, then broiled oysters and steamed spinach as a delicious garnish.  This is an alternate way to serve oysters cooked versus raw on a half shell.

Set a tropical theme by adding a Sushi Platter and fresh pineapple as a centerpiece.
In addition to your shellfish, think about perhaps serving a seafood salad with shrimp, oysters, clams and crab meat.  Sushi platters are also a hit and easy to keep fresh.  Add a bottle of Kikoman Soy Sauce and chop sticks to the table for your guests.  Having everything on platters allows your guests to help themselves and adds to the color and festivity of the table.

Green Tea on Tap: Have a drink dispenser on the table so guests can serve themselves chilled refreshments


Monday, April 30, 2012

Reserveage CocoaWell

CocoaWell supplements by Reserveage Organics contain pure plant flavanols.
More and more clinical research is pointing up the benefits of natural, organic foods for their antioxidant and nutritional qualities.  There are some foods that are naturally delicious such as almonds, tart cherries and dark chocolate.  Other healthy foods & herbs are more effective as concentrates but are unpalatable so dietary supplements can help fill the gap.

I had the opportunity to try Reserveage Organics CocoaWell line, specifically their Advanced CoQ10 Heart.  This supplement is a complex formula containing Green Tea and Acacia Catechu which works synergistically with CocoaWell Organic Cocoa Powder. CoQ10 is similar to vitamin E and is a naturally occurring compound found in every cell in the body.  As we age, the levels of CoQ10 begin to decline and if you are taking cholesterol lowering drugs such as "statins" your body's natural supply can be depleted even further.

Each time you exercise, (highly recommended!), you bring on what is called oxidative stress and free radical attack.  Just think of how rust forms on metal that is exposed to oxygen and the elements.  Aerobic exercise means that you are using oxygen so walking, running, cycling, swimming are all examples of that. Studies have shown that athletes who drank chocolate milk after exercising recovered more quickly than those who downed other post workout drinks. It is thought that the combination of carbohydrates, protein, calcium and the antioxidants present in the chocolate accounted in part for this, (Get our Super Chocolate Protein Shake Recipe HERE).  Taking an antioxidant rich supplement after exercising will go a long way to counteract cellular "rusting" effects.  Taking a supplement with multiple types of natural antioxidants is even better.  Advanced CoQ10 Heart is the first dietary product to combine heart - healthy organic cocoa and plant flavanols with CoQ10.  A side benefit of cocoa powder is added UV protection although I always wear a sunblock during outdoor activities.
 
ADVANCED CoQ10 HEART
I started out with one capsule a day of Advanced CoQ10 Heart (the recommended dosage is two caps per day). The suggestion is to take this supplement with food so I would take it with lunch.  After about a week, I noticed more power and less stress when taking that last major hill during my eight mile bike ride.  This was the case even though I had been off the bike for about a week due to weather.  I noticed the same thing for walking.  It seems I can go for a much longer period of time with out feeling fatigued.

I am now taking the recommended 2 capsules a day, but only 5 times a week. Supplements are highly concentrated food sources so you do not need to take them every day to derive benefits.  What I've found is greater cardiovascular endurance while working out and a quicker recovery afterwards. No jitters, just an even energy burn.  Oh yes and I do still enjoy that delicious piece of dark chocolate from time to time! 

New for your Spring & Summer Workouts: Zipper Line Hoodie by Carve Designs of CA


Wednesday, April 11, 2012

EASY to Bake Bread Recipe

Nothing says "Spring" like a fresh loaf of baked bread!  PHOTO: Cranberry Apple Walnut Bread
There is nothing so inviting as a loaf of fresh baked bread.  I count myself blessed to have been exposed to delicious home made yeast breads and even have my grandmother's Light Rolls recipe.  Once you've tasted the REAL deal, you'll know why I prefer to bake my own.  Really, you can too with a few basic pieces of equipment and an easy wholesome bread recipe.

If you have a bread machine, (mine here is the BREADMAN ULTIMATE ), well all the better but if not a Kitchen Aid Stand Mixer with a Dough Hook works just as well.

RECIPE: Bread Machine Sandwich Bread - 2 lb Loaf


3/4 Cup Milk
1/3 Cup Water
3 TBS Vegetable Oil or Butter
2 TSPS Salt
3 TBS Sugar
3 TBS Oatmeal
4 Cups Bread Flour
1 TBS Instant Dry Yeast (Fleischmann's)


Warm the water to about 100 degrees and dissolve in the yeast plus sugar.  Do the same with the milk and butter then add to the yeast liquid.  Pour into the bread machine container.  Whisk the dry ingredients together and add to the bread machine, select the loaf size, crust color and hit the start button ....that's it!  I have The Breadman Ultimate and The Bread Machine by Welbilt (Model AMB 3500) that beeps to tell you when to add extra ingredients.  When it's done, the machine will beep again.  Place on a rack and let fully cool before slicing.


Variations:
You can easily make the Cranberry-Apple-Walnut Loaf in the lead photo using this same recipe above and adding:


1 Cup Craisins (Dried Cranberries)
1 Chopped Macintosh or Red Delicious Apple
1 Cup Walnuts
1 TBSP Ground Cinnamon 


VitaMix Dry Grains Container


Grind Your Own Whole Grains

Another variation is to use different or freshly ground whole grains.  You can replace up to one half of the bread flour recipe with whole wheat, oat or almond flour.  Grinding your own whole grain flours insures the most nutrition and flavor.  Make your own whole wheat flour from wheat berries and you'll find you won't need to add any oil to the bread recipe.  The wheat kernels are already rich in nutritious oils!

I use my VitaMix to make almond milk but for grinding whole grain flours, get the Dry Grains Container which fits the newer 5200 Models.  This container has blades that are specifically designed to grind all sorts of grains into flour with graduations in cups, millimeters and ounces.  Once your flour is processed, add it right to your bread recipe in the machine or your stand mixer.  You can do the same with all sorts of  nut meals, quinoa, flaxseed, etc. to increase the protein, moisture and fiber content of your bread loaves. You have the peace of mind of knowing what wholesome ingredients are in your bread and can experiment with different amounts / grains to please yourself.


Baking Bread with a Stand Mixer

No Bread Machine?  No problem.  Just prepare this same recipe and place the dry ingredients in a Kitchen Aid Stand Mixer with a Dough Hook attachment, (see photo above).  Slowly add the liquids to the bowl and use the Dough Hook to knead it.  Remove the dough and place in an oiled bowl to rise, (it should double in size in about an hour), two times in a warm place. After the last rise, lightly punch down and place in a loaf pan to rise one more time before baking at about 350 degrees.

I've brought my homemade loaves of bread as hostess gifts, to picnics and holiday parties.  A hit every time!